
Write A Connector
Table of Contents
- Write A Connector
- Table of Contents
- Porting a connector to iTwin.js 3.x
- Introduction
- The basics of writing a Connector
- Connector SDK
- Advanced Topics
Porting a connector
To port an existing Connector originally written on iModel.js 2.x, it will be necessary to:
- Change the dependencies to the latest version of connector-framework (version 1.0.1 or greater). A complete list of dependencies needed for connector development is available below under Node Packages
- The older term "bridge" has been replaced with "connector". Therefore, the class "BridgeRunner" for example, is now called "ConnectorRunner". In other instances, the term "bridge" was removed altogether, so, "BridgeJobDefArgs" is now simply "JobArgs". Lastly, the term "iModel" has been similarly replaced by "iTwin" or omitted. Instead of "iModelBridge" your connector will extend "BaseConnector".
Introduction
Preface
What is a Connector
iTwin Connectors play an essential role in enabling a wide range of both Bentley and third-party design applications to contribute to an iTwin. Bentley iTwin Services provides connectors to support a wide array of design applications to ensure that all engineering data can be aggregated into a single digital twin environment inside an iModel.
As explained in the overview, a "Connector" is a program that:
- Reads information from a data source,
- Aligns the source data with the BIS schema and preferably a domain schema, and
- Writes BIS data to an iModel.
A complete list of available connectors can be found in iTwin Services Community Wiki
See Section on iTwin Synchronization for more details on existing connectors.
However, in some instances, where a specific format is not covered, one can start to develop a new Connector using the iTwin.js SDK
The ConnectorFramework package provided as part of the iTwin.js SDK makes it easier to write an iTwin Connector backend that brings custom data into a digital twin. To run this environment with the iTwin.js library that this package depends on requires a JavaScript engine with es2017 support.
Note: Please keep in mind iModelBridge is sometimes used as a synonym for iTwin Connector since it bridges the gap between input data and a digital twin. When discussing the classes, methods and properties of the SDK and especially in the code examples and snippets provided, this documentation will adhere to the actual names that are published to ensure it is working code. In 3.x and future versions of the SDK, classes and methods have been renamed from "Bridge" to "Connector" to reflect the latest terminology. This documentation has been updated to match the new names.
Who should read this guide?
This guide explains how to write a new Connector for a new format or data source.
It is not relevant for someone trying to bring in data for which a Connector already exists or is trying to federate data without it being part of the iTwin.
Ways to sync data to an iTwin
The iTwin Synchronizer portal and iTwin Synchronizer client provide a two different Ways to sync your data to an iTwin
The following are the various steps involved in that workflow.
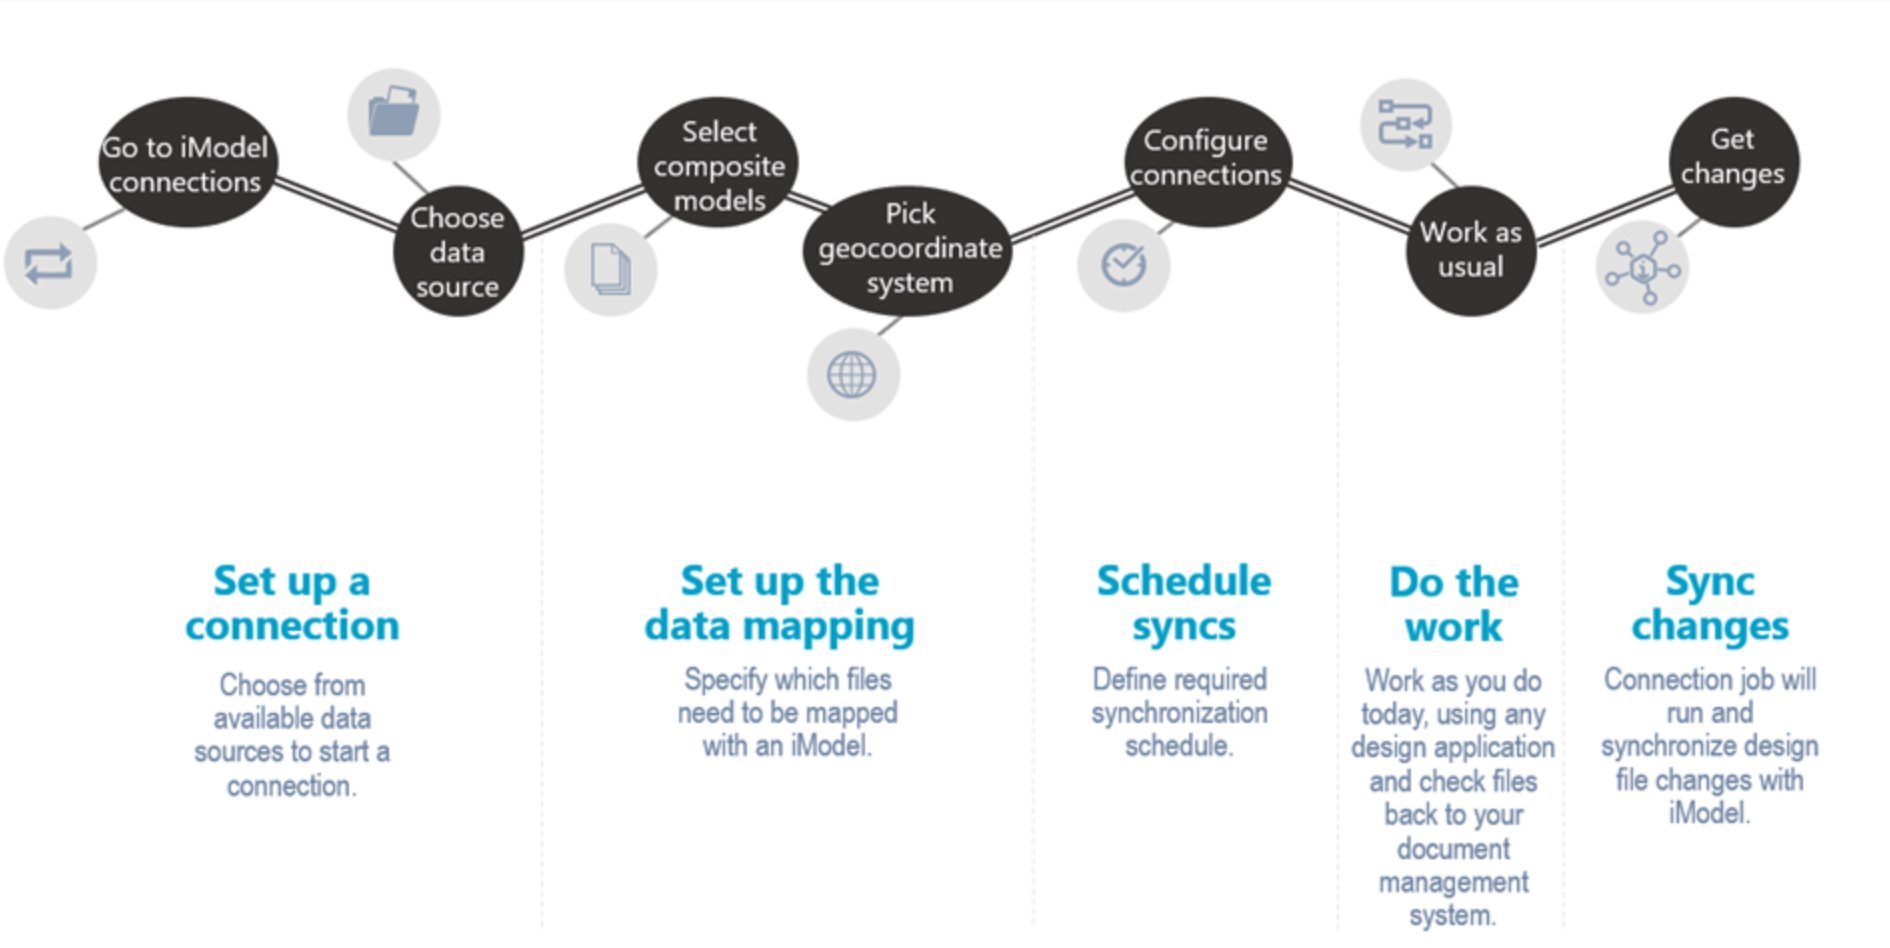
More on synchronization using connectors could be found here
Preliminary Reading
The guide assumes that you are somewhat familiar with iModel and iTwin concepts. A summary of the relevant topics is provided. To understand the APIs, you will need to have an understanding of typescript.
Two foundational articles which are highly recommended for background knowledge of building connectors are:
Structure of the guide
Foundations
This guide section is a quick refresher on the basic concepts one needs to know to write a new Connector.
iTwin
An iTwin is an infrastructure digital twin. An iTwin incorporates different types of data repositories -- including drawings, specifications, documents, analytical models, photos, reality meshes, IoT feeds, and enterprise resource and enterprise asset management data -- into a living digital twin. This link contains additional information about iTwins and Bentley iTwin Services
iModelHub
iModelHub is for users who want their iModels hosted by Bentley in Azure. It is responsible for coordinating concurrent access to iModels and changes made to them in ChangeSets. iTwin Connectors interact with iModelHub using the iTwin.js API. The Connector SDK provides a framework through which a Connector can easily maintain this interaction. For more information about iModelHub, please see iModelHub
iModel
An iModel is a specialized information container for exchanging data associated with the lifecycle of infrastructure assets. It contains digital components assembled from many sources. They are self-describing, geometrically precise, open, portable, and secure. The file format is based on open source SQLite relational database format and forms the backbone for iTwins
iModels were created to facilitate the sharing and distribution of information regardless of the source and format of the data. iModels are an essential part of the digital twin world. But a digital twin means a lot more than just an iModel.
An iTwin Connector provides a workflow to easily synchronize information from various third-party design applications or data repositories into an iModel.
Briefcases
A Briefcase is a local copy of an iModel hosted on the iModelHub. A Connector will download a briefcase using the ConnectorRunner and will write changes to the briefcase. Once all the work is done, the results are then pushed back into the iModel. Please see the section on Execution sequence on the different steps involved.
Element
iModel uses BIS schemas to describe the persistence model of the digital twin. An element represents an instance of a bis:Element class.
Changeset
A changeset represents a file containing changes corresponding to an iModel briefcase. For more information on changesets, please see Changeset
The basics of writing a Connector
Connecting data to an iTwin
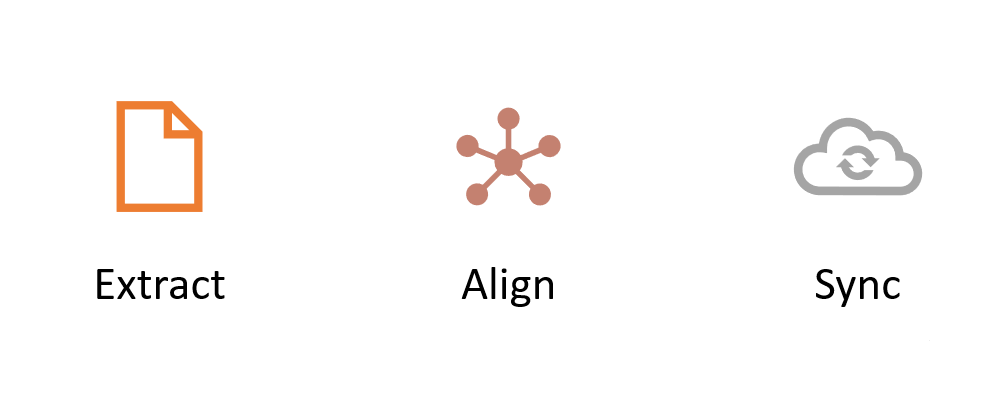
There are three main steps that a Connector needs to undertake to bring data into a digital twin
- Extract data from the input source
- Transform and align the data to the digital twin.
- Generate changesets and load data into an iModel.
The sections below give a high-level overview of the various parts that go into creating an iTwin Connector.
Data Extraction
Extraction of data from the input depends on the source format and a library capable of understanding it. There are two strategies typically employed for data extraction.
If the extraction library is compatible with TypeScript, write an extraction module to connect the input data with the alignment phase. The OpenSourceData method in your Connector typically calls the extraction library.
If a TypeScript binding is not available, extract the data into an intermediary format that can be then ingested by the alignment phase. In this case, the intermediate format will be read in the OpenSourceData method in your Connector.
A two-process architecture may also be employed.
Data alignment
An iTwin Connector must carefully transform the source data to BIS-based data in the iModel, and hence each Connector is written for a specific data source.
- Mappings of data are from source into an iModel.
- Typically, a Connector stores enough information about source data to detect the differences in it between runs (connections). In this manner, the Connector generates changesets that are sent to iModelHub. This is the key difference between a Connector and a one-time converter.
- Each connection generates data in the iModel that is isolated from all other connection's data. The resulting combined iModel is partitioned at the Subject level of the iModel; each connection has its own Subject.
For each iTwin Connector author, there will always be two conflicting goals:
- To transform the data in such a way that it appears logical and "correct" to the users of the authoring application.
- To transform the data in such a way that data from disparate authoring applications appear consistent.
The appropriate balancing of these two conflicting goals is not an easy task. However, where clear BIS schema types exist, they should always be used.
Schemas
See this article on Importing a schema and bootstrapping definitions
There are roughly three degrees of customizations you may need to employ to connect and align your data to an iModel. These degrees range from no customization at all (i.e., using the out-of-the-box domain schemas used by many of the Bentley authored Connectors) to extending the domain schemas to introduce additional classes (or subclasses) and properties. Finally, the most extreme level of customization which is to add classes and properties programmatically as your data is read (a.k.a, "dynamic schema").
Domain Schemas
Bentley has authored many "domain" schemas to support connectors for many of its authoring applications. For the most aligned data (i.e., data published from your Connector uses the same classes and properties as data published from other connectors), it is best to use a domain schema.
To see what domains exist in BIS, see Domains
Sometimes BIS domain schemas are not adequate to capture all the data in the authoring application. The flow chart below can be used to assist in deciding which schema methodology to use.
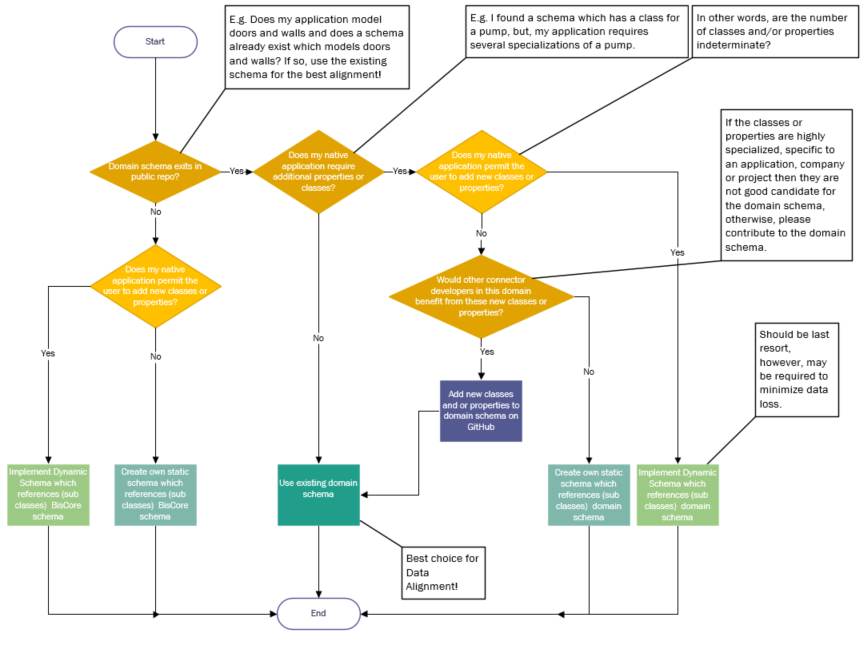
Dynamic Schemas
When the format for incoming data in the native source is not completely known, it is not possible to map the data to a fixed schema. A solution for this scenario is called Dynamic Schema. To avoid losing data, iTwin Connector may dynamically create application-specific schemas whose classes descend from the most appropriate BIS domain classes.
For example, if the native source allows for user-defined classes or properties, then as the classes and properties are read from the native source, they can be added to an iModel schema in-memory and real-time (a.k.a. dynamically). In effect, each native source file has its unique schema.
As an iTwin Connector always runs multiple times to keep an iModel synchronized, the schemas created by previous executions limit the schemas that subsequent executions can use. To provide consistency and enable concise changesets, the Connector adds to the previously-defined schemas (creating new schema versions). This follows the general schema update strategy defined in Schema Versioning and Generations
The DynamicSchema custom attribute should be set on customer-specific application schemas. This custom attribute can be found in the standard schema CoreCustomAttributes, enabling iModelHub to detect dynamic schemas programmatically. Dynamic schemas require special handling since their name and version are typically duplicated between iModels from different work sets.
Display Labels
Wherever practical, the Elements generated from an iTwin Connector should be identifiable through an optimal "Display Label."
As discussed in Element Fundamentals, the Display Labels are created through the following logic:
- If the UserLabel property is set, it is taken as the Display Label.
- If the CodeValue is set (and the UserLabel is not set), the CodeValue becomes the Display Label.
- If neither UserLabel nor CodeValue is set, then a default Display Label is generated from the following data:
- Class Name
- Associated Type's Name (if any)
iTwin Connector data transformations should be written considering the Display Label logic; UserLabel is the appropriate property for a Connector to set to control the Display Label (CodeValue should never be set for anything other than coding purposes).
But what value should an iTwin Connector set UserLabel to? There are two goals to consider in the generation of UserLabels. Those goals, in priority order, are:
- Consistency with source application label usage.
- Consistency with BIS domain default labeling strategy.
If the source application data has a property that conceptually matches the BIS UserLabel property, that value should always be transformed to UserLabel.
CodeValues
Next to the name of the class, CodeValue is the 2nd most important property in an iModel for alignment. Connectors should set CodeValue when a unique, human-readable identifier exists.
A common condition occurs where a property is generally readable and unique, but an occasional duplicate code value appears in the source data. Connector developers find that insertions are rejected due to duplicate CodeValues and simply forego setting CodeValue altogether - this practice is highly discouraged. It is strongly recommended that the duplicate code values are dealt with rather than skipping the setting of the CodeValues. The duplicate CodeValue could be taken as a cue to clean the source data. For example, are both of these rooms really an "office" or is one "office 301" and the other "office 302" or is one room the "bursar's office" and the other the "registrar's office"? Alternatively, programmatically the Connector developer can adjust the corresponding CodeScope and CodeSpec to ensure uniqueness.
For some elements in some models, such an identifier may really not exist. For example, a simple geometric line element w/o additional business data would not have an obvious, unique, and human-readable identifier, and it would generally be detrimental to generate a CodeValue solely for not leaving it blank. Additionally, generated CodeValues have a high chance of violating the "human-readable" requirement. In such a case, this section should not be taken as a directive to generate such an identifier when it doesn't exist.
Refer to Element Codes in the "Introduction to BIS" documentation.
Sync
Detecting and pushing changes
Rather than starting over when the source data changes, a Connector should be able to detect and convert only the differences. That makes for compact, meaningful changesets, which are added to the iModel's timeline.
In the case of source data that was previously converted and has changed, the Connector should update the data in the iModel that were the results of the previous conversion. In the case of source data that was previously converted and has been deleted in the source, the Connector should delete the results of the last conversion. Source data that has been added should be inserted.
To do incremental updates, a Connector must do Id mapping and change detection. The following sections describe how this is implemented.
Provenance and External Repository
A Connector is usually dealing with two levels of provenance
- What is the identity and metadata of a file or repository synchronized into an iModel?
- What is the identity of the element within that repository?
RepositoryLink is a specialization of a UrlLink which has a "Url" property pointing to an external resource or repository and a RepositoryGuid that identifies the external repository.
ExternalSource is an information container found in a repository. A few use cases for ExternalSources are listed below:
- A MicroStation DGN file, for example, may contain multiple models which in turn contain elements. The repository link would point to the DGN file while the ExternalSource would refer the models within the DGN file,
- In many cases, the external file is not a container for multiple smaller models, so there would be a one-to-one correspondence between an ExternalSource and its RepositoryLink,
- In the latter case, when there is also no possibility for referencing, layering or otherwise superimposing files and or models, then a common practice is to duplicate elements across one or more files to acheive the effect of reference elements. In this case, one element may refer to multiple ExternalSources and this is done via an ExternalSourceGroup
Case 1 : File metadata
ExternalSource and ExternalSourceAttachments are used to describe the original external file reference hierarchy.
To look up an existing ExternalSource:
If an ExternalSource is not found, insert one using
Example:
After calling Synchronizer.updateIModel, set the source property of the element's ExternalSourceAspect to point to the correct ExternalSource. Here is a code snippet:
At the start of the Connector's updateExistingData function, examine all existing elements to ensure their sources are set. The code shown above can be used to update an existing element's ExternalSourceAspect.
A Connector must also relate each physical model that it creates to the source document(s) that is used to make that model. Specifically, each Connector must create an ElementHasLinks ECRelationship from the InformationContentElement element representing the model to one or more RepositoryLink elements that describe the source document. When creating a physical partition model, link it to the RepositoryLink that corresponds to the source document. Synchronized.recordDocument in the Connector SDK provides the implementation for the above. Having a stable file identifier is critical to detect changes when the file is processed again by the connector. The connector provides this information in the SourceItem call.
Also refer to Provenance in BIS for more information about ExternalSource and related classes.
Case 2 : Id mapping
Id mapping is a way of looking up the data in the iModel that corresponds to a given piece of source data. If the source data has stable, unique IDs, then Id mapping could be straightforward.
See updateElementClass function in the provided sample. When the identifier is provided to the Synchronizer, it is stored inside the ExternalSourceAspect class in the Identifier property.
An iTwin Connector uses the ExternalSourceAspect class defined in the BIS schema to store information about the element.
Note: the Federation GUID is an optional property available for mapping external ids to elements in the iModel. The Code is also a helpful way of searching for an element based on external data. If the source data does not have stable, unique IDs, then the Connector will have to use some other means of identifying pieces of source data in a stable way. A cryptographic hash of the source data itself can work as a stable Id -- that is, it can be used to identify data that has not changed.
Change detection
The connector must use the supplied Synchronizer class to synchronize individual items from the external source with Elements in the iModel. This applies to both definitions and geometric elements.
In its ImportDefinitions and UpdateExistingData functions, the connector must do the following.
For each item found in the external source.
Define a [[SourceItem]] object to capture the identifier, version, and checksum of the item.
Then, check use Synchronizer to see if the item was previously converted.
If so, check to see if the item’s state is unchanged since the previous conversion. In that case, register the fact that the element in the iModel is still required and move on to the next item.
Otherwise, the item is new or if its state has changed. The connector must generate the appropriate BIS element representation of it.
Then ask Synchronizer to write the BIS element to the briefcase. Synchronizer will update the existing element if it exists or insert a new one if not.
Note that Synchronizer.updateIModel automatically adds an [[ExternalSourceAspect]] to the element, to keep track of the mapping between it and the external item.
The framework will automatically detect and delete elements and models if the corresponding external items were not updated or declared as seen.
Connector SDK
Getting started
You'll need to install a supported version of Node.js, Node 22 LTS is suggested. Please refer to development prerequisites for more details.
The node packages you'll need can be installed using
Also refer to Supported Platforms.
The ConnectorFramework SDK exposes its functionality through three main classes: ConnectorRunner, Synchronizer, and BaseConnector Interface.
ConnectorRunner
Constructor
The ConnectorRunner has a constructor which takes JobArgs and HubArgs as parameters.
Methods
The ConnectorRunner has a Run method that runs your connector module.
Synchronizer
An iTwin Connector has a private Synchronizer member which can be gotten or set via the synchronizer accessor. The Synchronizer helps comparing different states of an iModel and updating the iModel based on the results of those comparisons. Several public methods are available to facilitate your connector's interaction with the iModel: recordDocument, detectChanges, updateIModel, setExternalSourceAspect, insertResultsIntoIModel, onElementSeen. Visit the Change detection section to see examples of several of the Synchronizer's methods in use.
Connector interface methods
The connectorModule assigned to the JobArgs above must extend the BaseConnector class. This class has several methods that must be implemented to customize the behavior of your Connector.
InitializeJob
Use this method to add any models (e.g., physical, definition, or group) required by your Connector upfront to ensure that the models exist when it is time to populate them with their respective elements.
See also:
OpenSourceData
Use this method to read your native source data and assign it to a member property of your Connector to be accessed later on when it is time to convert your native object to their counterparts in the iModel.
ImportDefinitions
Your source data may have non-graphical data best represented as definitions. Typically, this data requires a single instance for each definition, and the same instance is referenced multiple times. Therefore, it is best to import the definitions upfront all at once. Override the ImportDefinitions method for this purpose.
ImportDomainSchema
Use this method to import any domain schema that is required to publish your data.
ImportDynamicSchema
Please refer to Implement a Dynamic Schema
For background on when to use a dynamic schema, please checkout Dynamic Schemas
UpdateExistingData
This method is the main workhorse of your Connector. When UpdateExistingData is called, models and definitions should be created and available for insertion of elements (if that is the desired workflow). Note: In the example below, definition elements are being inserted into the definition model at this point as well. Physical elements and Group elements can now be converted.
Execution Sequence
The ultimate purpose of a Connector is to synchronize an iModel with the data in one or more source documents. The synchronization step involves authorization, communicating with the iModelHub, converting data, and concurrency control. iTwin.js defines a framework in which the Connector itself can focus on the tasks of extraction, alignment, and change-detection. The other functions are handled by classes provided by iTwin.js. The framework is implemented by the ConnectorRunner class. A ConnectorRunner conducts the overall synchronization process. It loads and calls functions on a Connector at the appropriate points in the sequence. The process may be summarized as follows:
- ConnectorRunner: Opens a local briefcase copy of the iModel that is to be updated.
- Import or Update Schema
- Connector: Possibly import an appropriate BIS schema into the briefcase or upgrade an existing schema.
- ConnectorRunner: Push the results to the iModelHub.
- Convert Changed Data
- Connector:
- Opens to the data source.
- Detect changes to the source data.
- Transform the new or changed source data into the target BIS schema.
- Write the resulting BIS data to the local briefcase.
- Remove BIS data corresponding to deleted source data.
- ConnectorRunner: Obtain required Locks and Codes from the iModelHub and code server.
- Connector:
- ConnectorRunner: Push changes to the iModelHub.
Analyzing the Connector output
As a Connector developer, once the data is transformed into an iModel, one needs tools to analyze the validity of the conversion. The sections below give a summary of the recommended tools which allow a developer to query the graphical and non-graphical data in an iModel.
ECSQL
Please see this article on ECSQL as a prerequisite for this section. ECSql can be run against local and remote iModels using the Query API. On the web the iModelConsole can be used to interactively run ECSql against an iModel.
Some sample queries that is helpful to debug Connector output
Get the iModel Element id from the identifier from a given source file
SELECT Element.Id FROM bis.ExternalSourceAspect WHERE Identifier='<Element Id from File>'List of all known repositories (links to files in an iModel)
SELECT UserLabel, Url FROM bis.repositoryLinkList of all physical partitions present in the iModel
SELECT ECInstanceId, CodeValue from bis.physicalpartition
Visualizing the output
To get started, please build it using the instructions provided in the Tutorials Once the application is built and running, use the briefcase icon to open the output from the Connector.
Logs
See this article on Logging
Error Messages
See BriefcaseStatus
Building a test for a Connector
For examples of Connector tests, you can review the standalone and integration tests in the Connector framework. These tests use the test framework, mocha and the assertion library, chai
Advanced Topics
Job Subjects
The Framework will automatically create a uniquely named Subject element in the iModel. The job subject element should be a child of the root subject and must have a unique code.
A Connector is required to scope all of the subjects, definitions, and their models under its job subject element. That is,
- Subjects and partitions that a connector creates should be children of the job subject element,
- The models and other elements that the connector creates should be children of those subjects and partitions or in those models.
Schema merging
Schemas that have been released for production use in end-user workflows evolve as new capabilities are added, and other improvements are made. To manage and track this schema evolution, schema versioning is used. See Schema Versioning and Generations for details on BIS's schema versioning strategy.
Units and Coordinate systems
For the basics of coordinate systems in iModels, please see Geolocation
All coordinates and distances in an iModel must be stored in meters, and so the Connector must transform source data coordinates and distances into meters.
Before converting any source data, a Connector should account for the presence of an existing coordinate system and/or global origin in the iModel. The following conditions should be considered:
If the iModel has coordinate system information, transform the source data into the coordinate system of the iModel. Otherwise, initialize the iModel with the coordinate system appropriate to the source data.
If the iModel has a global origin, the Connector must subtract that global origin from the source data as part of the conversion.
Generally, for iModels primarily generated from connectors that deal with building data, a coordinate transform with linear transformation like ECEF will be better.
Dealing with geometry
Please see the section on GeometryStream to understand the persistence of iModel geometry. Inside a Connector, the input data geometry needs to be transformed and persisted as a geometrystream stored with the element. The geometry library provided as a part of iTwin.js will aid in the heavy lifting of complex calculations.
Typical workflow to create iModel geometry is
- Identify the suitable ECClass to persist your data. Typically this is a PhysicalElement
- Construct a GeometryStreamBuilder to help with collecting all the geometric primitives that will be used to create the element.
- Create and map individual geometric primitives from the input data and feed it into the geometrystream. To learn how to create individual primitives that will be fed into the geometrystreambuilder, the iTwin Geometry sample is a good starting point
- Provide geometry and other details to the element creation logic. Please see GeometricElement3d
Authentication
See this article on AccessToken
Locks & Codes
The Connector SDK takes care of acquiring locks and codes. It goes to iModelHub to acquire all needed locks and to request all codes used before committing the local transaction. The entire conversion will fail and be rolled back if this step fails. Note that this is why it is so crucial that a Connector must not call SaveChanges directly.
The connector’s channel root element is locked. No elements or models in the channel are locked. As long as the Connector writes elements only to models that it creates, then the framework will never fail to get the necessary access to the models and elements that a Connector inserts or updates.
A Connector is required to scope all of the subjects and definitions and their models under a job-specific "subject element" in the iModel. The only time a Connector should write to a common model, such as the dictionary model, is when it creates its job subject.
By following the job-subject scoping rule, many connectors can write data to a single iModel without conflicts or confusion.
Job-subject scoping also prevents problems with locks and codes. The codes used by a Connector are scoped by the job subject, and there should be no risk of conflicts and hence codes are not reserved.
Unmap
The Unmap mode allows removing all data from a given input source from the iModel. This is important because iModels contain data from many sources and users may need to selectively remove data (e.g. maybe it moved, maybe there's now a better Connector, or maybe it was added by mistake). shouldUnmapSource is a job argument (i.e. this.jobArgs.shouldUnmapSource) that can be passed to the ConnectorRunner and it will call the connector's unmapSource method.
ConnectorRunner calls the unmapSource method if argument is defined:
The testconnector demonstrates how to implement an unmapSource method.
unmapSource method in TestConnector:
Shared Channels
New to iTwinjs 4.6 (connector-framework version 2.1) is the concept of shared channels. The connector framework is updated to work with either shared channels or with channels requiring a channel key. Shared channels will be the default. The BaseConnector's getChannelKey method returns the shared channel. Note: beginning in iTwinjs 5.0, this will likely reverse and the default will require a channel key and the connector will need to override this method to get the shared channel key.
BaseConnector's getChannelKey method:
To use a channel key the connector author should override the getChannelKey in their connector implementation.
Example of getChannelKey override
For more information on channels see Working with "Editing Channels" in iModels
Deletion Detection
Deletion detection is simply the synchronizer's deleting of an existing element on subsequent connector runs based on the element's omission. For example, if a connector publishes elements a,b and c in the first run and then b,c and d in a subsequent run, a is determined to be deleted and the syncronizer will delete it along with any of a's children from the imodel.
Deletion Detection Params
When detectecting deletions, it is necessary to locate child elements of deleted elements to in turn delete the children and search for their children and so on. This location requires navigating from the top down through the hierarchy of elements. Unfortunately, earlier versions of the TestConnector, demonstrated external source aspects relating elements to partions rather than repository links which ultimately point back to files as the convention for model provinence requires. Some connector developers in turn, followed this example and similarly created the external source aspect relating to partitions rather than repository links. Therefore, it became necessary to support both 'channel based' (navigating from the JobSubject down) and 'file based' (navigating from a repository link down associated with an external source file). Thus, deletion detection params were introduced to allow a connector developer to steer the logic toward either file based (preferred) or channel based deletion detection.
Default implementation of getDeletionDetectionParams:
For an example of overriding getDeletionDetectionParams see:
The above example checks an environment variable which is strictly intended for the test connector as it allows us to test BOTH file based AND legacy (channel based) deletion detection with the same connector. Any new connector author/developer should choose file-based.
The tests which run the test connector with file-based deletion detection is located at:
Its channel based counterpart is located at:
Changeset Groups
Each connector run will create approximately five changesets for a given run. Some find it preferable to see a single entry for the complete run rather than several granular, intermediate changes. Changeset Groups were introduced to wrap these smaller changes under a single description.
It is easy to implement Changeset Groups in your connector, simply override the shouldCreateChangeSetGroup method to return true.
To further customize the ChangeSetGroup's description, you can override the getChangeSetGroupDescription otherwise it will return the name of the connector indicating that the multiple changesets within the group were created by the connector of that name.
More information
For more information please see:
Last Updated: 06 January, 2026